What is Helm in Kubernetes? A complete guide


What is Helm?
A simple way to define Helm is as a templating tool that generates Kubernetes resources. It’s a package manager that can install, update, and generally manage the lifecycle of applications packaged as "charts" in Kubernetes environments. These charts contain all the necessary configuration files and setting options needed, so deploying complex applications can be done with relative ease.
It’s a widely adopted CLI tool that has evolved over time, with Helm v3 being the current major version. A key difference between Helm 2 and Helm 3 is the removal of "Tiller", a server-side component in Helm 2 that raised major security concerns. Now Helm v3 is solely a client-side CLI tool.
Sign up and explore Distr
Distr is a battle tested software distribution platform that helps you scale from your first self-managed customers to dozens and even thousands.
Helm architecture
Helm v3 is made up of two main parts:
The Helm Client: This is the part you interact with directly via the CLI.
Used to:
- Package, and manage charts locally.
- Find pre-built charts (applications) in Helm repositories.
- Install, update, or uninstall applications in your Kubernetes cluster.
- Manage local repositories.
The Helm Library: This part does the heavy lifting behind the scenes.
Used to:
- Communicate with the Kubernetes API to deploy and manage your applications.
- Combines Helm templates with the user-defined
values.yamlfile to create a running application. - It stores information about your applications, so there's no need for a separate database.
Essentially, the Helm Client is the interface for managing applications, while the Helm Library handles the technical details of making those applications run on Kubernetes.
Why use Helm?
How long would manually deploying a complex application across multiple environments take? Without a solid package manager, it’s no easy task. Despite its limitations, Helm simplifies this process by making it easier to deploy complex applications made up of multiple Kubernetes objects.
It packages applications into charts (which will be covered in detail in the upcoming section). These charts include dynamic configuration templates, eliminating the need to manually define each YAML file individually. They come with default, pre-configured settings, which can easily be customized by adding dynamically injected values.
Here are some of the reasons why Helm is worth using:
- Helm charts provide pre-configured application packages, reducing manual configuration.
- Helm charts are versioned, so tracking changes and reverting to previous releases can be easily done. Upgrading standalone Helm charts (without dependencies) is also relatively straightforward.
- Charts were designed with reusability in mind, they can be easily shared and used across different projects and environments.
- With widespread adoption over the last decade, you can find a vast library of pre-built charts for many popular applications.
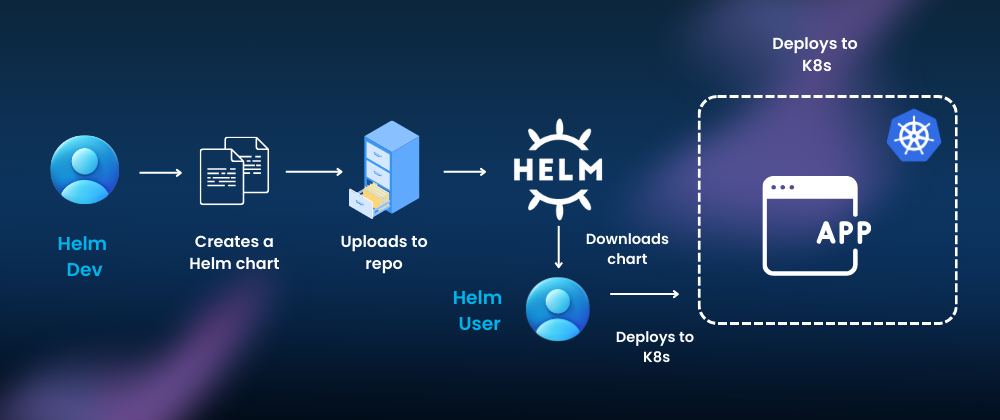
How does Helm work?
Helm is used to package applications into charts, which serve as templates for deploying resources to a Kubernetes cluster through the Kubernetes API. These charts define the structure and configuration of the application, simplifying deployment by automating the creation and management of Kubernetes objects.
In the next section, a deeper exploration of Helm’s components will be provided, along with a detailed tutorial and key commands to better understand its functionality.
What is a Helm chart?
A Helm chart is a package format for deploying applications on Kubernetes. It acts like a blueprint that contains all the necessary configurations, dependencies, and instructions needed to deploy and manage your application effectively.
Example chart diagram:
mychart/
  Chart.yaml          # Required: Chart metadata (name, version, description, etc.)
  LICENSE             # Optional: License information
  README.md           # Optional: Human-readable README file
  values.yaml         # Default configuration values
  values.schema.json  # Optional: JSON schema for values validation
  charts/             # Directory for chart dependencies if present
  templates/          # Kubernetes manifests and template files
    deployment.yaml
    service.yaml
    _helpers.tpl      # Example of a partial template
    NOTES.txt         # Optional: Usage notes displayed after installation
Key Components of a Helm Chart:
-
Templates:
- Template files define the Kubernetes resources required for your application, such as Deployments, Services, ConfigMaps, and more.
- They use the Go templating language, allowing for dynamic configuration. It's thanks to Go templating that the customization of aspects of kubernetes objects, like the number of replicas, container images, and resource limits, is possible. Allowing for the insertion of specific values at the time of installation.
-
Values:
- The
values.yamlfile contains default configuration settings for your application. This file serves as a centralized place for defining values that can be injected into the template files. - When installing a chart, you can override these defaults to adapt the deployment to your specific environment and requirements.
- The
-
Chart.yaml:
- This metadata file provides essential information about the chart, including its name, version, description, and any dependencies on other charts it might have.
- The
Chart.yamlfile helps manage versions and maintain compatibility with other charts.
-
values.schema.json:
- An optional file that defines a schema for validating the structure and types of values provided in
values.yamlor during installation.
- An optional file that defines a schema for validating the structure and types of values provided in
Dependencies in Helm Charts
Chart dependencies allow the user to define relationships between different charts. A chart can specify dependencies on other charts in its Chart.yaml file, listing them under the dependencies section.
Here’s an example of a Helm chart with two dependencies defined in the Chart.yaml file:
apiVersion: v2
name: my-tutorial-chart
description: A Helm chart for deploying the best Helm tutorial out there
version: 1.0.0
appVersion: 1.16.0

dependencies:
  - name: redis
    version: 14.8.12
    repository: 'https://charts.bitnami.com/bitnami'
  - name: mysql
    version: 8.5.3
    repository: 'https://charts.bitnami.com/bitnami'
You can use the helm dependency subcommand to manage these dependencies. For example:
# Update dependencies
helm dependency update [CHART]
# List dependencies
helm dependency list
These commands list and update chart dependencies, ensuring they match what’s specified in the Chart.yaml. However, it’s important to note that the dependencies are “super static” in nature and are bundled with the chart, meaning they cannot be modified or managed independently.
⚠️ This is one of the shortcomings we explained in a previously published article about helm shortcomings. Keeping Helm dependencies up to date is challenging, especially when there are breaking changes in upstream charts. On top of that, dependencies can introduce version compatibility issues, if a chart relies on a specific version of another chart with breaking changes, it can lead to deployment failures or unexpected behavior. So rigorous testing is always recommended.
Helm Chart Releases
A Helm chart release is an instance of a chart that has been deployed to a Kubernetes cluster. When you install a chart, you create a release encapsulating the configuration and state of that deployment. Each release has a unique name within a namespace. Helm releases can be upgraded, rolled back, or deleted.
What is a chart repository?
A chart repository is a place where Helm charts are stored, shared, and accessed. It serves as a centralized location for users to publish and retrieve Helm charts from, enabling easy distribution and management of Kubernetes applications.
Helm Tutorial
Let’s dive a little deeper into how to use Helm properly, focusing on the most important commands and strategies for managing the application lifecycle. Also looking at how to do chart verification and some debugging techniques.
How to create a Helm chart
The easiest way to start is to use the helm create command:
helm create my-tutorial-chart
This will generate a basic Helm chart directory with the following structure:
my-tutorial-chart/
  Chart.yaml
  LICENSE
  README.md
  values.yaml
  charts/
  templates/
    deployment.yaml
    service.yaml
    _helpers.tpl
    NOTES.txt
Next, edit the Chart.yaml file to provide information about your chart:
apiVersion: v2
name: my-tutorial-chart  # The name of your chart
description: A Helm chart for my deadly tutorial application  # A brief description
type: application # The type of chart (application or library)
version: 0.1.0  # The version of the chart (SemVer 2)
appVersion: "1.0"  # The version of the application
In values.yaml, set default configuration values for your application. These values can be overridden during installation.
The templates/ directory contains template files that define your Kubernetes resources. Here if where you should add any additional Kubernetes objects your application needs.
Then package the Chart into a .tgz archive: helm package my-tutorial-chart.
And then you are ready to deploy: helm install my-tutorial-release my-tutorial-chart-0.1.0.tgz
Validate and Lint the Chart
To make sure your Helm chart is well-formed and ready to deploy, you can validate it by using helm lint and helm template. First, run helm lint my-tutorial-chart to check for potential issues like missing mandatory fields or incorrect syntax. Then, use helm template my-tutorial-chart to render the Kubernetes manifests locally. If you see the yaml output in your terminal, you are good to go.
Helm commands
These are some of the most commonly used Helm commands and flags.
How to install a Helm chart?
helm install [RELEASE_NAME] [CHART] [flags]
A selection of some useful available flags:
--atomic: Rolls back the installation if any part of it fails. This ensures that you don't end up with a partially installed release.--dependency-update: Updates the dependencies of the chart before installing.--dry-run: Simulates an installation without actually deploying the chart. This allows you to preview the changes that would be made.--namespace <namespace>: Installs the release into the specified namespace.--set <key>=<value>: Overrides a value in the chart'svalues.yamlfile.--values <values.yaml>: Uses a different values file for the installation.- For more: use
helm install -hto find all of the other available flags.
How to upgrade an existing Helm release?
helm upgrade [RELEASE_NAME] [CHART] [flags]
A selection of some useful available flags: (the helm install flags are applicable here too)
--cleanup-on-fail: Deletes resources created during an upgrade if it fails.--force: Forces the upgrade even if there are no changes to the chart or values.--install: Installs the chart if a release with the specified name doesn't already exist.--reset-values: Resets any previously overridden values to the defaults defined in the chart.--reuse-values: Reuses the existing values from the current release and merges in any new values provided.--version <version-number>: Specifies the chart version to upgrade to.--wait: Waits for all resources to be in a ready state before marking the upgrade as successful.
How to uninstall a Helm release?
helm uninstall [RELEASE_NAME] [flags]
A selection of some useful available flags:
--keep-history: Retains the release history even after uninstalling.--no-hooks: Prevents hooks from running during uninstallation.--timeout <duration>: Sets a timeout for the uninstallation process.
How to list installed Helm releases?
helm list [flags]
A selection of some useful available flags: (also applicable for helm list, helm history, helm status, helm show)
--all-namespaces: Shows releases across all namespaces.--max <number>: Limits the number of releases to show.--namespace <namespace>: Filters releases by namespace.--output <format>: Outputs the results in a specific format (e.g., table, json, yaml).
How to view the history of a Helm release?
helm history [RELEASE_NAME] [flags]
How to view the status of a Helm release?
helm status [RELEASE_NAME] [flags]
How to show information about a helm chart?
helm show [chart|values|all] [CHART] [flags]
How to rollback a Helm release to a previous revision?
helm rollback [RELEASE_NAME] [REVISION] [flags]
A selection of some useful available flags:
--cleanup-on-fail: If the rollback fails, this flag allows Helm to delete new resources that were created during the rollback process.--history-max <int>: Limits the maximum number of revisions saved per release. By default, Helm keeps a history of the last 10 revisions. Use 0 for no limit.--recreate-pods: Performs a pod restart for the resources in the release.
How to add a Helm chart repository?
helm repo add [REPO_NAME] [REPO_URL] [flags]
A selection of some useful available flags:
--no-update: Prevents automatic updates of the repository index.--username <username>: Specifies a username for authentication.--password <password>: Specifies a password for authentication.
How to update Helm repositories?
helm repo update [flags]
A useful flag:
--debug: Enables verbose output, providing more detailed information about the update process.
How to manage Helm chart dependencies?
helm dependency [build|list|update] [CHART] [flags]
A useful flag:
--verify: Verifies the integrity of the dependencies.
How to package a Helm chart?
helm package [CHART_DIRECTORY] [flags]
A selection of some useful available flags:
--destination <path>: Specifies the directory to save the packaged chart.--sign: Signs the chart with a PGP key.--version <version>: Overrides the chart version specified inChart.yaml.
How to lint a Helm chart?
helm lint [CHART_DIRECTORY] [flags]
A selection of some useful available flags:
--strict: Enables stricter linting rules.--values <values.yaml>: Lints the chart with the specified values file.
How to sign a Helm chart?
First, ensure you have GnuPG installed for creating signatures.
helm package [CHART_NAME] --sign --key [KEY_ID] --keyring [KEYRING]
- The
--signflag will sign your chart using your GPG key, and the--keyflag specifies the ID of the key you want to use.
How to debug Helm charts?
Debugging Helm charts can be challenging, more than likely you are going to have to approach any given issue from multiple angles, there are several steps you can use to identify and fix issues that might arise during deployment, upgrade, or rollback. Here are some of the main methods for debugging Helm charts:
1. Use Helm’s built-in debugging option
Helm provides a --debug flag that gives a detailed output when running commands. This can help pinpoint where the issue lies.
Example:
helm install my-release ./my-chart --debug --dry-run
--debugprovides verbose output for troubleshooting.--dry-runrenders the templates without actually deploying, showing what will be deployed in Kubernetes.
2. Inspect rendered templates
You can use the helm template command to view the fully rendered Kubernetes manifests allowing you to check for errors or inconsistencies in the resource definitions before deploying.
Example:
helm template my-release ./my-chart
3. Check Kubernetes logs
Sometimes, the issue isn’t with Helm but with the Kubernetes resources created by the chart. Checking the logs of failing pods or events can give you more insight.
4. Validate your YAML files
Misconfigurations in the YAML will always cause issues. Use kubectl apply --dry-run=client -f to test your YAML files.
Reference our comphrensive kubectl guide here.
Example:
helm template my-release ./my-chart | kubectl apply --dry-run=client -f -
Check for any schema validation issues in your Kubernetes manifests before applying them.
5. Inspect Helm release status
If you’ve already deployed a Helm release and encountered issues, use Helm status to see the current state of the release.
Example:
helm status my-release
This will show whether the release is in a failed state or not as well as details about the deployed resources.
6. Use Helm "get" commands
You can inspect specific aspects of your Helm release using commands like Helm get. This can help you debug the current state of a release after it has been deployed.
View the release’s manifest:
helm get manifest my-release
View release values (both default and overridden):
helm get values my-release
View release history:
helm history my-release
Helm security
With so many attack vectors in modern software, security is crucial when creating, running, sharing, and collaborating on Helm charts. To ensure you're doing this safely, here are a few key considerations:
Secure your Helm environment
- Implement Role-Based Access Control (RBAC) in your Kubernetes cluster to restrict who can install, modify, or delete Helm releases. The principle of least principle is the rule of thumb here.
- Only grant the necessary permissions to Helm. Avoid using
cluster-adminprivileges unless absolutely necessary. - Use network policies to control communication between Helm components and other services in your cluster. Limit access to only what's essential.
Harden your Helm charts
- Avoid hardcoding sensitive information like passwords and API keys directly in your Helm templates. Instead, use secrets and environment variables.
- Regularly scan your Helm charts for security vulnerabilities with tools like Trivy.
- Don't trust user input blindly. Validate and sanitize any values provided by users to prevent injection attacks and ensure data integrity.
Helm best practices
Many of the security tips above are good rules to abide by when working with Helm, let’s just make sure to cover the majority of the bases and explore some additional best practices when working with Helm in Kubernetes environments.
When creating Helm charts:
- Treat your charts like code: Just as you wouldn't deploy untested code, don't deploy untested charts. Diligently version your charts using SemVer2, and keep a detailed changelog. Before unleashing your chart to the public, validate its functionality with thorough tests.
- Secure your Helm charts: In the world of software, trust is paramount. Sign your Helm charts to guarantee their integrity and authenticity, ensuring that what you deploy is exactly what you intended to deploy.
- Automate for consistency: Manual processes are prone to errors. Integrate these best practices into a robust CI/CD pipeline to enforce consistency and eliminate human fallibility. Automate linting with
helm lintto catch errors early, and automate the signing and publishing of your charts to maintain a secure and reliable workflow.
Deploying third-party Helm charts:
- Trust but verify: While Helm charts are convenient, don’t deploy too quickly. Before deploying a chart, especially one from a third-party source, take the time to understand the Kubernetes objects it creates. Verify the authenticity of downloaded charts using
helm verifyto ensure they haven't been compromised. - Stay ahead of the curve: The Kubernetes ecosystem is constantly evolving. Keep your Helm charts, the
helmbinary itself, and any associated plugins up-to-date to benefit from the latest bug fixes and security patches. Regularly review and update your deployed charts to minimize vulnerabilities and ensure optimal performance. - Secrets deserve extra protection: Kubernetes secrets, despite their name, require additional safeguards. Employ like helm-secrets or sealed-secrets to encrypt and manage your sensitive data, adding an extra layer of security to your deployments.
FAQ’s
Where are Helm charts stored?
Helm charts can be stored in a few different places:
Remote Repositories: These are online , mostly on GitHub, that host publicly available Helm charts. You can also find charts on GitLab, BitBucket, and other code hosting platforms too. For private Helm repository hosting, Glasskube is a good option.
Local Repositories: You can set up your own private Helm repository to store and share charts within your organization. This gives you more control over access and distribution. Tools like ChartMuseum and JFrog Artifactory can help you create and manage your own repositories.
Within a Chart Package: Once you've finalized a Helm chart, you can package it into a .tgz file. This package contains all the necessary files and metadata for the chart, making it easy to share and deploy.
OCI Registries: OCI (Open Container Initiative) registries, like Docker Hub and Azure Container Registry, can also store Helm charts as OCI artifacts. This allows you to manage your charts alongside your container images in a centralized location.
In what language are Helm charts written?
- The core templating engine within Helm charts is based on Golang's templating language. This allows you to dynamically generate Kubernetes manifest files (YAML) by embedding variables, using control structures, and calling functions.
- The final output of Helm templates are Kubernetes manifest files, which are written in YAML (Yet Another Markup Language). These files define the desired state of your Kubernetes objects, such as deployments, services, and pods.
What’s the difference between Helm and Kustomize?
Helm and Kustomize are both Kubernetes configuration management tools, but they take two different approaches:
- Helm: Uses templates to generate manifests. They are like blueprints with parameters you can customize. It's great for packaging and sharing complex applications.
- Kustomize: Uses overlays to customize existing manifests. It's like having layers of customizations you can apply on top of a base configuration. It's simpler for basic customization but can be less flexible for complex applications.
Essentially, Helm is better for packaging and distributing applications, while Kustomize is better for customizing existing configurations.
We will explore the differences between Helm and Kustomize and how to work with them in conjunction in an upcoming post.
What is helm include?
helm include is a template function used within Helm charts to import and render other templates. It allows you to break down your templates into smaller, reusable components and combine them to create the final Kubernetes manifests.
{{ include "myhelper.myfunction" . }}
What are Helm hooks?
Helm hooks are special Kubernetes resources defined within a Helm chart that allow you to execute specific actions (which are executed by Jobs) at certain points during a Helm release's lifecycle. Think of them as event triggers that perform tasks before, during, or after installation, upgrades, or deletion.
Here are some of the various hooks Helm provides to cater to different needs:
- pre-install
- post-install
- pre-upgrade
- post-upgrade
- pre-delete
- post-delete
- pre-rollback
- post-rollback
Hooks are defined as Kubernetes manifests (YAML files) within your chart's templates directory. They are identified by a special “helm.sh/hook“ annotation, here is an example of how to use Helm hooks:
apiVersion: batch/v1
kind: Job
metadata:
  annotations:
    "helm.sh/hook": "post-install"
Helm recognizes this annotation and executes the Job in this case after the chart installation is complete.
What is the Helm diff plugin?
The Helm diff plugin lets you preview changes to your Kubernetes resources before upgrading a Helm release. It compares the current state of your release with the proposed changes from your updated chart, showing you a clear "diff" of additions, deletions, and modifications. This helps you avoid unexpected consequences, understand the impact of updates, and troubleshoot issues. Install it with:
helm plugin install https://github.com/databus23/helm-diff
and use it by running:
helm diff upgrade [RELEASE_NAME] [CHART] [flags]
to see the differences before you apply them.
How to use Helm if else?
Helm uses the Go templating language, which includes if/else blocks for conditional logic within your templates. Here's how you can use them:
{{ if CONDITION }}
  # Code to execute if the condition is true
{{ else if ANOTHER_CONDITION }}
  # Code to execute if the first condition is false and this one is true
{{ else }}
  # Code to execute if none of the above conditions are true
{{ end }}
Let’s see and example that sets the replicas count to 3 if the environment value is "production", otherwise it defaults to 1.
apiVersion: apps/v1
kind: Deployment
spec:
  replicas: {{ if eq .Values.environment "production" }} 3 {{ else }} 1 {{ end }}
What’s the difference between Helm install vs upgrade?
helm installis used to install a new Helm chart into your Kubernetes cluster. It creates a new release, which is essentially an instance of a deployed chart.helm upgradeis used to update an existing Helm release. It takes an existing release and applies any changes from the updated chart or configuration.
Is Helm only used in Kubernetes environments?
Yes, Helm is specifically designed for Kubernetes environments.
Where does Helm fall short?
- Managing and updating charts that include many sub-charts is a difficult and manual process.
- Upgrading Custom Resource Definitions (CRDs) is not possible in Helm v3.
- Managing dependencies between charts can be quite inefficient, and there’s a lack of standardization around it.
- Helm often requires tools like Kustomize for advanced customization, adding another layer of complexity.
- Helm doesn’t have a server-side component to actively monitor deployed applications for health issues, making it difficult to detect application degradation or "drift."
- The Go templating language can be difficult to debug, making troubleshooting complex charts a nightmare.
Which are the most common Helm errors?
Helm users frequently encounter a few common errors, and here are some of the most notable ones along with possible solutions:
-
Error: "installation failed: cannot re-use a name that is still in use"
- Cause: this occurs when trying to install a release with a name that is already taken by an existing release.
- Solution: Either delete the existing release with
helm delete <release-name>or choose a new, unique name for the new release.
-
Error: "upgrade failed: another operation (install/upgrade/rollback) is in progress"
- Cause: this happens when Helm is already performing an action, and a new operation is triggered before the current one finishes.
- Solution: Wait for the ongoing operation to complete or manually clean up any stuck resources with
kubectl, especially if resources like pods or deployments are causing a blockage.
-
Error: "installation failed: must either provide a name or specify --generate-name"
- Cause: this occurs when no release name is provided during installation and the
--generate-nameflag isn't used. - Solution: Either specify a release name
(helm install <release-name>)or use the--generate-nameflag to allow Helm to auto-generate a unique name for the release.
- Cause: this occurs when no release name is provided during installation and the
-
Error: "installation failed: Helm release not found"
- Cause: this occurs when Helm is unable to locate the specified release because it’s either stored in a different namespace or doesn’t exist.
- Solution: Ensure that you’re operating in the correct namespace by using the
--namespace <namespace>flag. Alternatively, use the-Aflag (short for--all-namespaces) to search across all namespaces for the release.
Conclusion
Helm is a widely adopted package manager for Kubernetes. Like most tools, it’s easy to get started with, but fully mastering it takes time. There's a lot to consider when managing complex applications in Kubernetes environments. Despite its shortcomings, Helm is here to stay, and it’s definitely worth learning how to get the most out of it.
Sign up and explore Distr
Distr is a battle tested software distribution platform that helps you scale from your first self-managed customers to dozens and even thousands.